
We are going to carry out an analysis of an amigurumi pattern through which we will see:
- General aspects of a pattern: materials, abbreviations, filling and finishing of the piece.
- Use of the different types of rows to give rise to the following figures: oval, perfect sphere, thin and elongated shape with variation of size and simple, triangular shape crocheted into spiral and straight way, half sphere, elongated irregular shape, flat circle, lineal shape.
- Form an edge in the fabric.
- Losing stitches by crocheting in straight.
- Calculation of the sequences that we use in the increasing and decreasing rounds: combinations of stitches.
We start with the Materials that we are going to need so that our amigurumi is as similar as possible to the one that appears as a model in the pattern.
MATERIALS
- Yarn of different colors: brown, light brown, dark brown, white, black. The use of different ranges of the same color in certain areas or parts of a piece will have a contrasting effect.
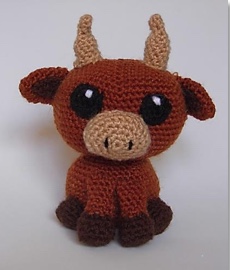
- Yarn thickness: 3-4 mm. It is important that we use the proper thickness or otherwise the dimensions of the doll can vary. In our case, the little bull measures 14 cm.
- Crochet needle suitable for the thickness of the yarn.
- Yarn needle to join the different parts of the doll.
- Fiberfill
The Abbreviations I normally use in my patterns are these, although we may find more.
Sc: single crochet.
Inc: increase
Dec: decrease
St: Stitch
We must fill the amigurumi as we crochet. The normal thing will be begin to fill it when we have crocheted approximately half of the piece, but sometimes its own structure will tell us when we should do it. Thus, for example, we can leave a wide piece without filling up the last 3 or 4 rows (head, body). On the other hand, a narrow one will force us to do it almost from the beginning (legs). More than anything, it’s about using a little common sense and not starting too early, which can make it difficult to crochet the piece or leave it for the last moment, having more work.
Once we have everything ready, we begin to crochet the amigurumi. We do it first by the main parts, that is, normally, head or body.
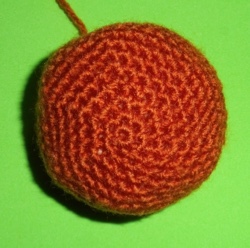
HEAD
With brown yarn
We crochet it in spiral, that is, with continuous rounds, for which we must use the round marker and thus establish the end of one round and the beginning of the next.
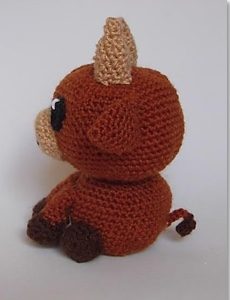
the little bull’s face should be round, so we started forming a:
- 6 sc Magic Ring. It is at this time that we will place the round marker.
We start with the increasing rounds, until reaching the desired width. When starting from a base of 6 sc , we must create combinations of stitches with increases whose result of total points is a multiple of 6 (12, 18, 24, 30 …). Later I will explain how to do the calculations.
- Inc in every st (12).
- “1 sc, inc” repeat (18).
- “2 sc, inc” repeat (24).
- “3 sc, inc” repeat (30).
- “4 sc, inc” repeat (36).
- “5 sc, inc” repeat (42).
- “6 sc, inc” repeat (48).
- “7 sc, inc” repeat (54).
- “8 sc, inc” repeat (60).
Once we have the desired width, about 8 cm, we leave the increase rounds, to start with the fixed rounds which will determine the height of the figure.
The head of our little bull will not be a perfect sphere, but oval, wider than high, so the number of fixed rounds will be less than the number of increasing rounds. In the analysis of this amigurumi pattern, I will explain these to you
- to 20. 1 sc in each st (60).
Once the height is set, we only have to close our figure. For this, we will use the decreasing rounds, combining in the same way that we have done with the increases, the stitches with the decreases. We will do it in reverse, again using the multiples of 6, the base of our pattern.
- “8 sc, dec” repeat (54).
- “7 sc, dec” repeat (48).
- “6 sc, dec” repeat (42).
- “5 sc, dec” repeat (36).
- “4 sc, dec” repeat (30).
- “3 sc, dec” repeat (24).
- “2 sc, dec” repeat (18).
- “1 sc, dec” repeat (12).
- Dec in all stitches (6).
Fasten off.
In my patterns, when I talk about fasten off a piece, I mean to hold the thread by a slip stitch and sometimes make a small knot to secure and be able to cut it. Before cutting we must think about the joining of the pieces, having to leave a long thread and thus sew more comfortably. It is not necessary to do it in all the pieces, but it will depend on the type of join. In the example that we are seeing, for the joining of head and body, it will be enough to leave the thread in one of the two.
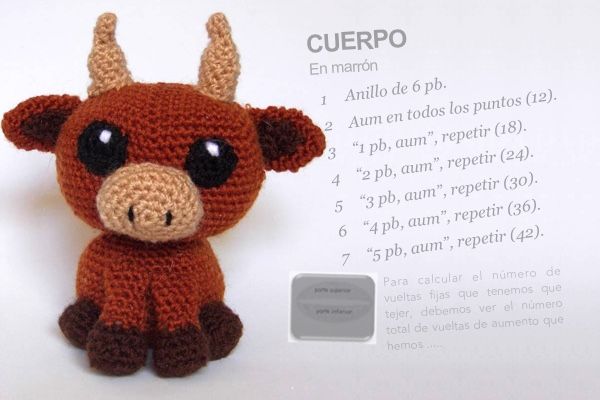
BODY
With brown yarn
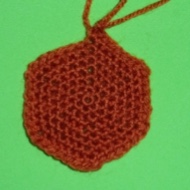
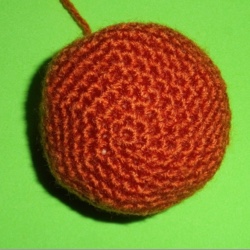
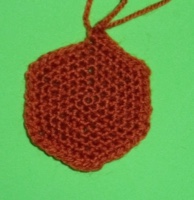
The body of our little bull will be smaller than his head and this time will not be oval, but a perfect sphere.
In the analysis of this amigurumi pattern, I will explain these to you
We will follow the same method that we have used in the head, but to reduce the width of the figure, we must crochet less rows of increase. As we can see, the fact of doing 3 less rows implies a decrease of 18 sc in our piece.
- Work 6 sc in magic ring.
- Inc in every st (12).
- “1 sc, inc” repeat (18).
- “2 sc, inc” repeat (24).
- “3 sc, inc” repeat (30).
- “4 sc, inc” repeat (36).
- “5 sc, inc” repeat (42).
To calculate the number of fixed rounds we have to crochet this amigurumi pattern, we must see the total number of rounds we have made: 7 and add 1 more round. So, we must crochet 8 fixed rounds.
- to 15. 1 sc in each st (42).
We close the piece with the Decrease rounds in reverse of the increases rounds, but not totally. We leave the piece open with 18 sc to sew the body to the head.
- “5 sc, dec” repeat (36).
- “4 sc, dec” repeat (30).
- “3 sc, dec” repeat (24).
- “2 sc, dec” repeat (18).
Fasten off.
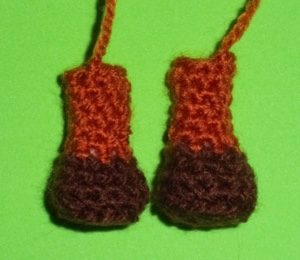
FRONT LEGS (x2)
The legs should be thin and long, so we will do few rounds of increase and more fixed rounds. We are also interested in the dark brown hoof being wider than the rest of the leg, so when changing color we will do 1 round of decrease. To sew it to the body we will leave the piece open, so it will not be necessary for us to use final decrease rounds.
Let’s see how to do it step by step:
With Dark brown yarn
- Work 6 sc in magic ring.
As the shape is round, we start with the magic ring and again use the base of 6. After this, a single round of increase will be enough to achieve the desired width.
- Inc in every st (12).
In the next round we will form a small edge in the fabric, so that the base of the hoof is differentiated with respect to the lateral. For this, we crochet in back loops only, thus leaving the front loop free, that is, the outside part, as an edge.
- Crochet in back loops only 1 sc in each st (12).
We keep the width of the hoof crocheting 2 fixed rounds, reaching the necessary height.
- And 5. 1 sc in each st (12).
We can begin to crochet the leg, for which we will change color and we will use a decreasing round making it narrower than the hoof. For this, we will not use the base of 6, because with that number of sc it would be very narrow.
In this analysis we see that we have 2 alternatives to make a Regular decrease of a 12 sc round in this amigurumi pattern:
Use as a base of 3 or 4, that is, calculate a combination of stitches with decreases that allow us to reduce the row in 3 sc or 4 sc.
To reduce 3 sc we need to add in our sequence 4 stitches. The calculation consists in dividing the number of total stitches that we have among the stitches we want to remove (12/3 = 4). Thus, the sequence would be: “2 sc, 1 dec” (The dec counts as 2 stitches).
In the pattern, however, we have opted to make a dec of 4 sc. The method to calculate the appropriate combination of stitches is the same: 12/4 = 3, that is, we must add in the sequence 3 stitches. The decrease, as we have said, counts as 2 stitches, so we should only use 1: “1 sc, 1 dec”
- Change to brown yarn and crochet “1 sc, dec” repeat (8).
Complete the leg achieving the desired height with the fixed rounds, leaving the piece open to sew it to the body.
- To 12. 1 sc in each st (8).
Fasten off. In this type of pieces of small size, open end and that are attached to a larger piece we must leave a long thread for sewing.
HIND LEGS (x2)
In the analysis of this amigurumi pattern we see how this structure is similar but simpler than the one used with the front legs. We will not change color or size reduction. The single increase round will establish the width of the piece to the end.
Again we will form the small edge before starting with the fixed rounds, crocheting in back loops only. Because it’s shorter, it will be enough to make 2 fixed rounds.
With Dark brown yarn
- Work 6 sc in magic ring.
- Inc in every st (12).
- Crochet in back loops only 1 sc in each st (12).
- And 5. 1 sc in each st (12).
Fasten off.
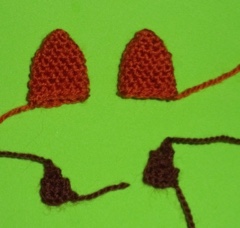
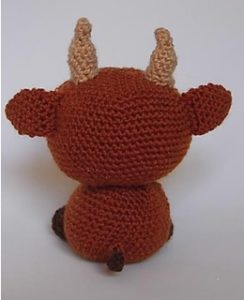
EARS (x2)
We form the ears with 2 pieces, in this way, to make contrast with the colors, differentiating the inside and the outside of the ears.
We are going to crochet the outer part of the ears in spiral, but giving the piece a pointed shape in the beginning and triangular in the rest. To achieve this, we will repeat in the first round the same stitches that we have worked on the ring.
With brown yarn
- Work 6 sc in magic ring.
- 1 sc in each st (6).
To keep the triangular shape it’s necessary that the increasing rounds use as base a number of stitches lower than that of initial magic ring. We use the base of 3. I will explain later how to calculate it.
- “1 sc, inc” repeat (9).
- “2 sc, inc” repeat (12).
To finish, we keep the width unchanged and determine the length with fixed rounds.
- To 10. 1 sc in each st (12).
We leave the pieces open (without final decreasing rounds) to sew more easily and to keep their flat shape we don´t fill them or we do it very little.
Fasten off.
We are going to crochet the inner part of the ears in straight, that is, starting with chains and crocheting rows of sc over them, decreasing 1 sc in each row to give them triangular shape.
With Dark brown yarn
- 5 chains, 4 sc over them.
As we said, we need to dec 1 sc in each row and for that don’t ch 1 (turn the piece without separation chain). Let’s see what this process consists of:
If we crochet a piece in straight and wish to maintain the shape and number of stitches, when we reach the end of the row, we must make a chain on the last sc that will serve as a separation between that row and the next. Once this chain is made, we rotate the piece and crochet the sc towards the other side, starting this new row with 1 sc over that chain and at the same time over the last sc of the previous row. By doing this, we keep the straight form and the same number of stitches.
But if we need to change the shape, reduce the width and lose stitches, we must do it at the ends and for this, we don´t make a separation chain, which prevents us from making the first sc of the new row over the last sc of the previous one, forcing us to start at the next, losing 1 sc. By following this process in successive rows we will reduce the width of the fabric in a progressive way giving a triangular shape to the piece.
- Don’t ch1, turn and crochet 3 sc.
- Turn and crochet 2 sc.
- Turn and crochet 1 sc.
Fasten off.
Sew this piece on the outside of the ear.
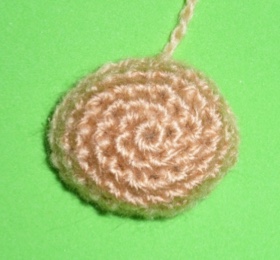
SNOUT
It will have a form of half sphere so we only crochet the increasing and fixed rounds. We get its rounded shape again using combinations based on 6 stitches.
With Light Brown yarn
- Work 6 sc in magic ring.
- Inc in every st (12).
- “1 sc, inc” repeat (18).
- “2 sc, inc” repeat (24).
- And 6. 1 sc in each st (24).
Fasten off.
we are already finishing the Analysis of this Amigurumi Pattern;)
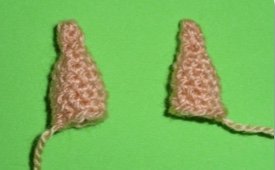
HORNS: (x2)
In the analysis of this amigurumi pattern we see how the pieces are the most irregular of all the ones we have used. They have a very sharp start, a variable progression to finish on a regular form.
We started with a ring of 4 sc, the smallest we can do
With Light Brown yarn
- Work 4 sc in a magic ring.
We form the pointed tip keeping the same stitches that we used in the initial magic ring in the next 2 rounds.
- and 3. 1 sc in each st (4).
We increase the piece with an increasing round with a combination based on 2 stitches . Let’s calculate it: Total stitches (4) divided by the stitches that we want to increase (2) gives us a result of 2.
As dec count as 2 sc, the increases count as only 1.
- “1 sc, inc” repeat (6).
This time we will do a increasing round with a combination based on 3 stitches .
6 divided by 3 gives us a result of 2
- “1 sc, inc” repeat (9).
To finish, we will do fixed rounds until we have the desired length.
- To 10. 1 sc in each st (9).
Fasten off.
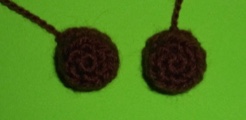
EYES (x2)
They are flat circles, without volume. We managed to give this form by not making any fixed or decreasing rounds, simply with the increasing round.
With black
- Work 6 sc in magic ring.
- Inc in every st (12).
Fasten off.
We embroider with white yarn the twinkle
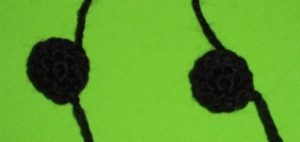
TAIL
Its fine and linear shape forces us to simply use one row of chains and another of single crochets. To crochet it easier we will do it by joining directly on the body.
With brown yarn
We join directly into the fabric in the back center part and ch 6. Return to the beginning with 5 sc.
As a final detail of the tail we will make 3 treble crochets as a tuft at the tip
With dark brown yarn we engage at the end and crochet 3 treble crochets together. Fasten off with a slip stitch.
That’s all! I hope you liked this analysis of a amigurumi pattern!
If you have any questions about a pattern or want to comment something do not hesitate to leave your comment below and I will help you delighted.
Happy crochet!


¡Qué chulo Gretel! Menudo trabajo de disección de un amigurumi. Lo voy a hacer a ver que tal me queda! Se aprende mucho con tus explicaciones. Un besito!
Mil gracias Irene! Me alegro de que te haya gustado la explicación y sobre todo que te sea de utilidad. Besos!
Hola Gretel, me encantan tus explicaciones… y sobre cómo sujetar la cabeza, me gusta la de reforzar los puntos, al hacer ese procedimiento, se teje la vuelta completa y enseguida los puntos anteriores, o se puede ir haciendo al mismo tiempo?
Hola Patricia, muchas gracias!
No estoy segura de entender tu pregunta cuando te refieres a hacerlo al mismo tiempo. Quieres decir haciendo un pb normal y sobre él, como si se tratase de un aumento, tomar el pb de la vuelta anterior y el que acabas de hacer para tejer el pb de refuerzo?
Si es eso, la verdad es que no lo había pensado.
Siempre he tejido la vuelta central y luego, a continuación, la vuelta de refuerzo.
Hacerlo simultáneamente, tal y como lo he interpretado, supone hacer al fin y al cabo aumentos, con lo cual alteras tanto el tamaño de la pieza como el número de puntos.
Si te refierías a otra cosa y lo he entendido mal, por favor acláramelo.
Gracias
Saludos
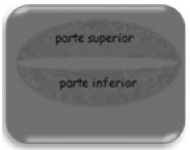
Quiero hacer un pingüino, pero solo tengo la foto. Como hago los aumentos para que tenga una parte inferior más prominente?. Es como si fuera un triangulo ósea muy barrigudo
Hola Quety!
Tendrás que hacer vueltas de aumento hasta que tengas un poco menos del ancho que quieras. Para eso, utiliza secuencias combinando los puntos bajos con los aumentos y que el aumento sea regular. Lo más sencillo es que utilices la secuencia del 6, aunque dependerá de lo que hayas hecho hasta ahora.
Cuando tengas un poco menos que el ancho que quieras, teje las vueltas fijas, manteniendo el mismo número de puntos totales. Las primeras todavía aumentarán un poco el ancho del muñeco. Después, las harás para aumentar el alto. A más vueltas fijas, más alto será el pingüino. Para terminar, teje vueltas de disminución, siguiendo la secuencia que has usado en las de aumento pero a la inversa.
Espero haberte ayudado con esta sencilla explicación. Seguro que haces un pingüino gordito precioso.
Saludos.
Woooow! estoy maravillada con tus explicaciones, estan geniales! Este animalito esta en mi lista de cosas por hacer. Gracias!
Me alegro de que te guste María de la Luz! Gracias por comentar!
Saludos
Me encanta como lo explicas y se ve mas sencillo yo apenas empiezo a tejer amigurumis para mi hijo, este lo empezare en estos dias!! Estoy siguiendo tus consejos desde escoger lalana y demas tips!!!
Muchas gracias Lorena! Seguro que a tu hijo le encanta todo lo que haga su mamá.
A veces nos cuesta un poquito cuando estamos empezando pero aquí estoy para ayudarte.
Un abrazo y un besito para tu pequeño.