Posted on 35 Comments

Son Goku Free Amigurumi Pattern (Dragon Ball)

Difficulty: High
Estimated time: 6 h
Size: 8,6″ / 22 cm
Hook size: 2,50 mm
Recommended yarn: 50% Acrylic 50% cotton

MATERIALS

  • Yarn of different colors: red, skin color, white, black, yellow, brown
  • Thickness of the yarn: 3 – 4 mm
  • Hook according to the thickness of the yarn.
  • Yarn needle
  • Fiberfill

ABBREVIATIONS

  • Sc: Single crochet
  • Inc: increase
  • Dec: Decrease
  • St: Stitch

Stuff the doll with fiberfill as you crochet.

FEET
With blue yarn
1. Work 6 sc in magic ring.
2. Inc in every st (12).
3. 3 inc, 3 sc, 3 inc, 3 sc (18).
4. “1 sc, inc” 3 times, 3 sc, “1 sc, inc” 3 times, 3 sc (24).
5. ch 1, turn and go on to crochet by the inside, sc in the post of each st (24). Join at the end with 1 slip st. You will return this round to complete the sole of the shoe.
6. ch 1, turn and by the outside, crochet 1 sc in each st (24).
7. Mark 12 st at front. For this, mark 1 sc at front and count 5 sc to one side and 6 sc to the other, so you will have a 12 sc segment. Crochet 1 sc in each st until you reach the first marked sc. Dec over them (6). (18)
8. 12 sc, 3 dec (15).
9. Change to white yarn and crochet in back loops only (15). You will return to complete the shoes.
10. And 11. 1 sc in each st (15).
12. Change to black yarn and crochet “3 sc, dec” (12).
13. And 14. 1 sc in each st (12).
15. Change to red yarn. Inc in every st (24).
16. Inc in every st (48).
17. to 24. 1 sc in each st (48).
25. “6 sc, dec” repeat to the end of the round (42).
26. 1 sc in each st (42).
27. “5 sc, dec” repeat (36).
28. “4 sc, dec” repeat (30).
29. “3 sc, dec” repeat (24).
30. 1 sc in each st (24).
Fasten off the first leg.
Crochet the second one and leave it without fastening off.

Joining of the legs:
Place one leg next to the other leg; mark the center point between legs. Crochet in the leg that is not fastened off 1 sc in each st until you get the marker. Join the first leg with a sc, then sc in each st until you reach the marker and join the second leg with a sc. They are 48 sc in all. Sew the hole between the legs with the yarn needle.
Continue crocheting:
1. 1 sc in each st (48).
2. “6 sc, dec” repeat (42).
3. “5 sc, dec” repeat (36).
4. And 5. 1 sc in each st (36).
6. “5 sc, inc” repeat (42).
7. “6 sc, inc” repeat (48).
8. to 14. 1 sc in each st (48).
Begin to crochet the neckline:
15. Mark 2 central stitches at front that you will crochet with skin color yarn. The rest will be with red yarn (48).
16. Add 1 sc on each side with skin color yarn (4), the rest with red yarn. (48).
17. Add 2 sc on each side with skin color yarn (8), the rest with red yarn. (48).
18. Add 2 sc on each side with skin color yarn (12), the rest with red yarn. (48).
19. Add 2 sc on each side with skin color yarn (16), the rest with red yarn. (48).
20. Add 2 sc and continue with skin color yarn, you no longer need to use the red yarn anymore (48).
21. Dec in every st (24).
22. Dec in every st (12).
23. And 24. 1 sc in each st (12).
25. Sc in the post of each st (12)
HEAD
With skin color yarn
1. “1 sc, inc” repeat (18).
2. “2 sc, inc” repeat (24).
3. “3 sc, inc” repeat (30).
4. “4 sc, inc” repeat (36).
5. “5 sc, inc” repeat (42).
6. “6 sc, inc” repeat (48).
7. “7 sc, inc” repeat (54).
8. “8 sc, inc” repeat (60).
9. to 13. 1 sc in each st (60).
14. “9 sc, inc” repeat (66).
15. “10 sc, inc” repeat (72).
16. to 18. 1 sc in each st (72).
19. “10 sc, dec” repeat (66).

20. “9 sc, dec” repeat (60).
21. 1 sc in each st (60).
22. “8 sc, dec” repeat (54).
23. “7 sc, dec” repeat (48).
24. Dec in every st (24).
25. 1 sc in each st (24).
26. “2 sc, dec” repeat (18).
27. “1 sc, dec” repeat (12).
28. Dec in every st (6).
Fasten off.

HAIR
With black yarn
1. Work 6 sc in magic ring.
2. Inc in every st (12).
3. “1 sc, inc” repeat (18).
4. “2 sc, inc” repeat (24).
5. “3 sc, inc” repeat (30).
6. “4 sc, inc” repeat (36).
7. “5 sc, inc” repeat (42).
8. “6 sc, inc” repeat (48).
9. 30 sc (leave 18 sc unworked).
10. ch 1, turn and crochet 30 sc (30).
11. to 17. ch 1, turn (30).
18. From this row don’t ch 1 By doing this, you will dec 1 sc in each row (29).
19. (28)

20. (27).

Fasten off.


TUFTS
Crochet:
• 2 big
• 3 medium
• 6 small (4 to the bangs).

Small:
1. Work 4 sc in magic ring.
2. 1 sc in each st (4).
3. “1 sc, inc” repeat (6).
4. “2 sc, inc” repeat (8).
5. “3 sc, inc” repeat (10).
6. “4 sc, inc” repeat (12).

Medium:
7. “5 sc, inc” repeat (14).
8. “6 sc, inc” repeat (16).
9. “7 sc, inc” repeat (18).
10. “8 sc, inc” repeat (20).

Big:
11. “9 sc, inc” repeat (22).
12. “10 sc, inc” repeat (24).
13. “11 sc, inc” repeat (26).
14. “12 sc, inc” repeat (28).
15. “13 sc, inc” repeat (30).
Fasten off.

ARMS (x2)
With red yarn
1. Work 4 sc in magic ring.
2. Inc in every st (8).
3. “1 sc, inc” repeat (12).
4. “2 sc, inc” repeat (16).
5. 1 sc in each st (16).
6. Change to skin color yarn and crochet in back loops only 1 sc in each st (16). You will return to this round to complete the sleeve.
7. “3 sc, inc” repeat (20).
8. to 10. 1 sc in each st (20).
11. “3 sc, dec” repeat (16).
12. “2 sc, dec” repeat (12).
13. And 14. 1 sc in each st (12).
15. “2 sc, inc” repeat (16).
16. to 20. 1 sc in each st (16).
21. “2 sc, dec” repeat (12).
22. Dec in every st (6).
23. Inc in every st (12).
24. “1 sc, inc” repeat (18).
25. “2 sc, inc” repeat (24).
26. And 27. 1 sc in each st (24).
28. Dec in every st (12).
29. Dec in every st (6).
Fasten off.
EARS (x2)
With skin color yarn
1. Work 6 sc in magic ring.
2. Inc in every st (12).
3. And 4. 1 sc in each st (12).
Fasten off, fold in half and curve when sewing.
EYES (x2)
With white yarn
1. Work 6 sc in magic ring.
2. 3 inc. (6).
Fasten off.
Embroider with black yarn the pupils and eyebrows as shown in the picture.
COMPLETE THE SLEEVES
With red yarn
Return to round 6 of the arms and holding the arm with the hand pointing up, crochet 1 sc in each st (16).
WRISTBANDS (x2)
With blue yarn
1. Chain 13.
2. Work 12 sc in the chain.
Fasten off.
Sew on his arm.
BELT
With black yarn
1. Ch 61.
2. 60 sc.
Tied at the waist.
COMPLETE THE NECKLINE
With red yarn
Crochet Sc in the post of each st starting with the neck.

INSIGNIAS

Frontal:

With yellow yarn

1. Work 6 sc in magic ring.
2. Inc in every st (12).
3. change to black yarn and crochet 1 sc in each st (12).
Rear:
With yellow yarn
1. Work 6 sc in magic ring.
2. Inc in every st (12).
3. “1 sc, inc” repeat (18).
4. Change to black yarn and crochet 1 sc in each st (18).
Embroider the Japanese symbols with black yarn.
TAIL
With brown yarn
1. Work 6 sc in magic ring.
2. “1 sc, inc” repeat (9).
3. to 30. 1 sc in each st (9).
Fasten off.

COMPLETE THE SHOES:
With white yarn, crochet on the edge 1 sc in each st, completing the sole. With blue yarn, return to round 9 and crochet in the free loops 1 sc in each st.

FINISHED!!
I hope you liked it and, above all, that you enjoyed crocheting Son Goku.
Do not forget to leave me your comment! 😉

Pattern: Download the Son Goku Free Amigurumi Pattern

Download the Spanish version here.

Posted on 64 Comments

3 mistakes you should avoid when crocheting amigurumis

Hello, how about going back to school? …

First I want to apologize for being so long without writing, I’m involved with an amigurumi animal project and the truth is that I do not have much time to dedicate to the blog.

Continue reading 3 mistakes you should avoid when crocheting amigurumis

Posted on 5 Comments

New Updates Section

Hello!

As much effort you put into doing things right, there is something that escapes me. What happens is not for you?

At the hour of writing my amigurumi patterns I put all my attention, but is a process of many steps: the draft and the final on paper and then step into digital format, write, add photos, editing, proofreading, translation …

And when you least expect a number that can ruin the whole pattern escapes, or repeat a sequence, or you skip a turn, the self-correcting plays a trick on you … a thousand things can go wrong.

Thinking and thinking about how to make you things easier, because no matter how hard I will still be minor niggles, I decided to add a new section to the website with updates and bug patterns that make them.

This way you can easily check if there have been any changes to your employer and to download and updated from your account.

Continue reading New Updates Section

Posted on 7 Comments

Use of Chains and Stitches in Amigurumi

This time I will talk about the different uses that we can give to the chains and single crochets depending on where we use them and how we crochet on them.

We will see:

  • Initial Chain
  • Separation chain
  • Crochet all around the piece with single crochets
  • Complete the piece by taking only one free loop

Are practices that you can find frequently in my amigurumi patterns, so it is possible that you are familiar with them

If you are starting, I recommend you that first learn the basic stitches to crochet amigurumis.

Continue reading Use of Chains and Stitches in Amigurumi

Posted on 10 Comments

Analysis of a Amigurumi Pattern

We are going to analyze a very simple pattern through which we will see:

  • General aspects of a pattern: materials, abbreviations, filling and finishing of the piece.
  • Use of the different types of rows to give rise to the following figures: oval, perfect sphere, thin and elongated shape with variation of size and simple, triangular shape crocheted into spiral and straight way, half sphere, elongated irregular shape, flat circle, lineal shape.
  • Form an edge in the fabric.
  • Losing stitches by crocheting in straight.
  • Calculation of the sequences that we use in the increasing and decreasing rounds: combinations of stitches.

Continue reading Analysis of a Amigurumi Pattern

Posted on Leave a comment

Amigurumi Increases and decreases

After seeing the basic stitches to crochet our amigurumis, we need to learn to use them in the right way and at the right time to give them the desired shape.

Let’s see two simple ways through which we can give form to all the necessary figures to create our amigurumis.

INCREASES

Amigurumi Increases and decreases

Amigurumi Increases and decreases

They consist in making two stitches on the same stitch, first one and then another.

This will allow us to increase the weave surface, this is, make it wider.
Continue reading Amigurumi Increases and decreases

Posted on 6 Comments

Colors Spaceship Amigurumi Pattern

I like the idea of traveling through space, discover other planets, think that there are wonderful worlds inhabited by extraordinary beings … let the imagination fly …

But don’t you think the spaceships are a bit boring?

Are we going to travel through the universe on a sad gray spaceship?

Of course not!

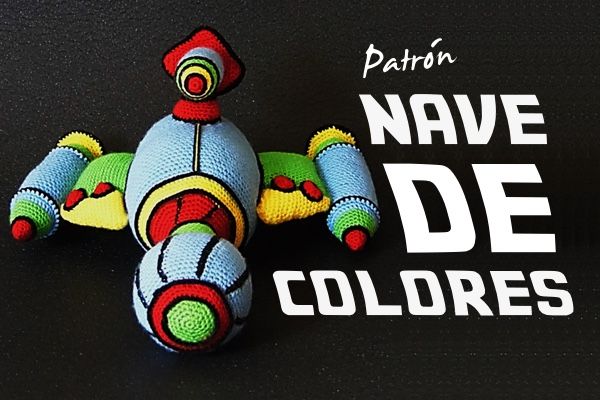
I show you a new pattern: This fun colors spaceship that will be the envy of most intrepid captains.

With the one-piece crocheted hull and big other pieces, it´s the perfect toy for kids.

As in all my designs is completely soft and also, when using bright colors and highlighting the elements in black, we give it the appearance of a cartoon. Continue reading Colors Spaceship Amigurumi Pattern

Posted on Leave a comment

Dolphin Keychain free Amigurumi Pattern

Here is a new pattern that you are going to love: Dolphin Keychain free Amigurumi Pattern

They say “A friend is a treasure” and what a better show of affection towards our loved ones than giving them a piece of love crocheted with our own hands.

If it´s also cute, simple and soft, better than better.

I show you my new work, an ebook with which you will enjoy crocheting nothing less than 50 small size amigurumis suitable for all tastes and crochet skills:

Continue reading Dolphin Keychain free Amigurumi Pattern

Posted on 1 Comment

Basic Stitches to Crochet Amigurumis

Let’s start learning the basic stitches we must crochet to give life to our amigurumis:

CHAIN

It is the basic stitch par excellence and give rise to many of our creations.

It consists of forming a slipknot that, as its name indicates, “we will chain” several times until we achieve the length that we are interested in obtaining.

In my amigurumi patterns you can find it to start the fabric in straight, or form various elements such as thick eyebrows, hair strands, horns, etc.

In this video you can see how it’s done:

Continue reading Basic Stitches to Crochet Amigurumis