Let’s start learning the basic stitches we must crochet to give life to our amigurumis:
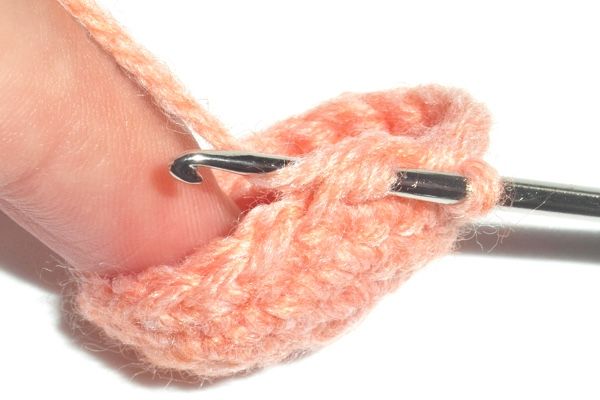
CHAIN
![]()
It is the basic stitch par excellence and give rise to many of our creations.
It consists of forming a slipknot that, as its name indicates, “we will chain” several times until we achieve the length that we are interested in obtaining.
In my amigurumi patterns you can find it to start the fabric in straight, or form various elements such as thick eyebrows, hair strands, horns, etc.
In this video you can see how it’s done:
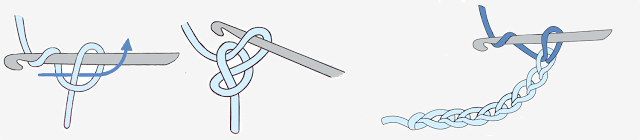
MAGIC RING
![]()
This stitch gives rise to most amigurumis.
Note: The ideal is to find the most comfortable way to do it, because a priori the theory may seem complicated, when in practice there is no difficulty.
You will find several variants of how to make magic ring.
I’ll show you how I do it:
It involves twisting the thread on the index finger.
1.- Hold the end of the thread with the thumb and middle finger of the left hand and place it on the index finger, surround it and overlap the long side on the short one forming an X on the finger.
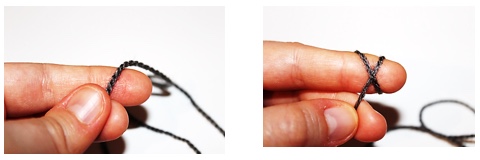
2.- We take the hook with the right hand and pass it below the upper right part of the X to lift it, engage the left part and pass it underneath.
We have thus the thread in the hook ready to crochet on it a chain taking the long end.
This chain will serve to fasten the thread in the form of a ring.

Let’s look at its form for a moment: Half of our ring has two threads (the short thread rolled up over the one that forms the ring), while the other half has just one thread.
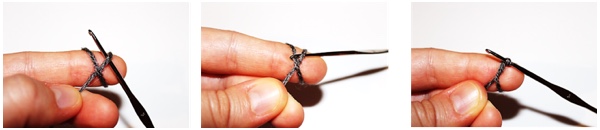
3.- After the fastening chain, crochet single crochets in the double half, taking the two threads at the same time.
We will make as many stitches as indicated by the pattern (normally 6) and then close the ring.
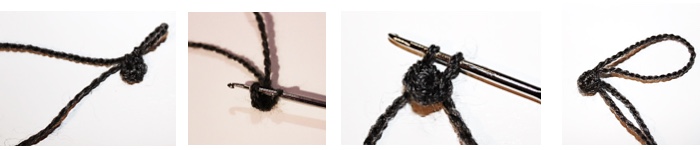
4.- Close the ring: we must pull the short thread to close the hole and complete the ring with a slip stitch over the first single crochet.
WATCH OUT: We must not confuse the first single crochet with the fastening chain. To make sure, we simply have to count the stitches from the hook back to the start. In this way we will not be wrong.
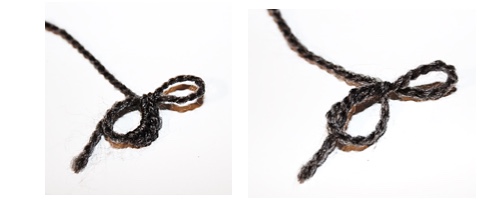
As I said, this is my particular way of doing magic ring and you can find it in my amigurumi patterns to start most of the pieces.
You will see them in different sizes, from the largest of 12 single crochets, the medium ones of 8, to the most common ones of 6 and the small ones of 4.
Other uses that we can give it are:
- Crochet a round figure, for example a pair of glasses, forming a ring with so many single crochets that allows us to leave a central hole when closing it.
- Crochet a half sphere if we leave it without closing with the slip stitch, for example to make small ears.
Here’s a video example of how to make the magic ring:
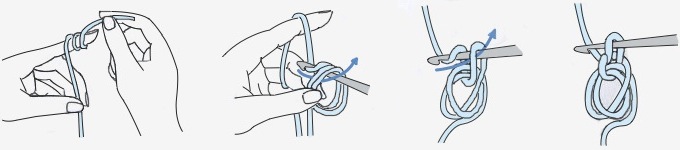
SINGLE CROCHET
![]()

Together with the chain is the basic stitch when crocheting amigurumis. We use it for everything, but yes, never in isolation, that is, the single crochet is always crocheted on another stitch.
Let’s see how to crochet it:
- On chains: After making a series of chains, we will have a thread on the hook. What we will do is insert the hook into the chain, take the yarn and return, thus obtaining two threads in the hook. We take the yarn again from the outside and introduce it in these two threads, having only one.
- On another single crochet: Let’s look at the shape that has a single crochet. As we see it is formed by two loops (back and front). We have several options:
- Crochet a normal single crochet, taking the two loops simultaneously, that is, with a thread already in the hook we introduce it under both parts, we take the yarn and return obtaining 2 threads, to finish the stitch taking again the yarn and introducing it in these two threads, as we have done previously when crocheting the single crochet on the chains. It is the stitch that I use the most in my patterns and it is the main basis of each piece.
- Crochet by taking only one of the loops, or the lower part (front loop, as I will explain later in the case of decreases) or the top one (back loop) thus leaving the lower part free, which will allow us to retake the fabric at that point. You can find it in my patterns both in its usual use to decrease and leave free loops returning to the fabric later to make a new piece (for example a dress) or complete the existing one (bottom of the pants). I also use it to sew several pieces together, taking the part that is free.
- Finally, let’s look at 2 stitches together and in their union with the previous round. It is what I call in some of my patterns “vertical part of the chains”. Crochet the single crochets in the post of each stitch consists of introducing the hook, which will already have a thread in it, below this part, in a horizontal position, to then make the single crochet as I have explained. As you can see, it is not about modifying the execution of the single crochet, but its location and instead of introducing the hook in the chain, in the two loops of the stitch or in a single one, we introduce it in this lower part, this join between stitches. Making the single crochets in this way will allow us to form edges and reliefs on the fabric and you can find them in my patterns on multiple occasions, for example to highlight an area or change the direction of the fabric (in hats, edges of straight pieces, etc.)
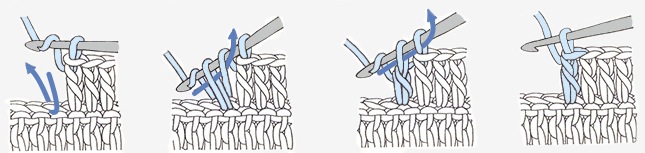
HALF DOUBLE CROCHET:
![]()
Through Half double crochet we will win high and wide in our fabric.
It is a modification of the single crochet.
With one thread already in the hook, instead of introducing it into the weave as in the single crochet, what we will do is take another thread around the hook.
Already with the two threads placed on the hook we introduce it in the fabric and we take the yarn obtaining 3 threads, we take again the yarn and introduce it on the three threads at the same time, remaining in the hook only one.
Both this stitch and the next, the double crochet, serve to increase both the height and the width of our fabric, especially if we crochet several only on one stitch. You will find it in my patterns to form waves, for example in dress collars.
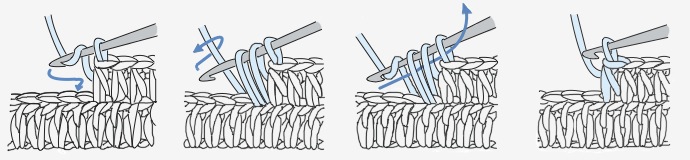
DOUBLE CROCHET:
![]()
The double crochet is a variant of the previous stitch and I personally like it more.
It is done in the same way, but it differs from the half double crochet in its completion, increasing it in one step.
When we have the 3 threads in the hook and take the yarn, instead of removing it through the three, we will do it through the first two, leaving 2 threads in our hook.
Finish then crocheting a single crochet, that is, taking up the yarn and introducing it into both threads to have one at the end.
A third variant I use very little is TREBLE CROCHET:
It differs from the double crochet both in its beginning and in its completion.
Having one thread in the hook, instead of taking another one from the yarn, what we do is take two, that is, we twist the yarn twice in the hook.
Now we can introduce the hookin the stitch, take the yarn and remove it again by the stitch, obtaining 4 threads in the hook.
We only have to finish the stitch. If we made two steps for the double crochet, in the treble crochet we will do it in three steps.
With the 4 threads in the hook, we take the yarn and pass it through the first two (we will have 3 threads), we take it again and pass it through the next two (we will have 2 threads) and finally we take it and pass it through those two threads so that we will only have one.
The Treble crochet will make us gain even more height, with the disadvantage from my point of view of giving rise to a separation between the stitches that limits its use and prevents its filling.
SLIP STITCH
![]()
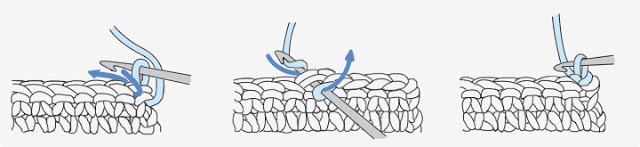
It is the minimum stitch. With it we move on the stitches, make them more compact and we do not gain height.
With a thread in the hook, we introduce it into the fabric and taking the yarn we go through everything, both the fabric and the thread, all at once, forming the stitch and remaining again with a thread in the hook.
Its most characteristic use is in the closing of the magic Ring. You can find it in my patterns for example to form edges, finish a piece or close it joining two rows of stitches.
Now that you know the basic stitches, let’s see how to use them:
Following entry: Amigurumi Increases and Decreases.
Share this Tutorial:
[addthis tool=”addthis_inline_share_toolbox_djcd”]